After running a homelab on an old laptop for many years, I finally decided to bite the bullet and finally part out a PC to use as my home server, to run my websites, cloud storage, home automation using Home Assistant, and local DNS resolution on my network. The specs of the final build were as follows:
- AMD Ryzen 4600G
- 4x8 GB DDR4 3200 by Crucial
- Gigabyte Gaming X B450 Motherboard
- 1TB SSD storage
- 12TB HDD storage
- Cooler Master MWE 450 Bronze V2 450W PSU
Despite the current silicon shortages, acquiring the parts was surprisingly quick and painless. After collecting all the components that were ordered, I begun the simple process of assembling it all together only to discover that I got no sign of life upon pressing the power button. Now, it was my first time building a PC but it wasn’t my first time taking on a project like this, which made it all the more confusing as to why there was a problem. I was reading the motherboard’s manual and scratching my head when suddenly it hit me. The motherboard was manufactured in October 2020, which meant that the BIOS revision on the motherboard was much older than what was required in order for it to support my CPU. This was quite a big problem. I had no older CPU which I could use to update the motherboard, and without this, the build was completely halted. I tried looking around local shops in order to find anyone who would update the BIOS but could not find anyone willing to take the project on, leaving my only option being taking the 45 minute drive to the closest service center in order to get it updated.
Since this project had to be halted while I could figure out what I could do about this situation, I continued undertaking smaller projects in order to keep busy. While looking around my drawer for DuPont leads for something else, I found my saving grace, a CH341A programmer and an EEPROM clip. I had completely forgotten that I had these in my possession, and immediately realized that they are what going to save this project.
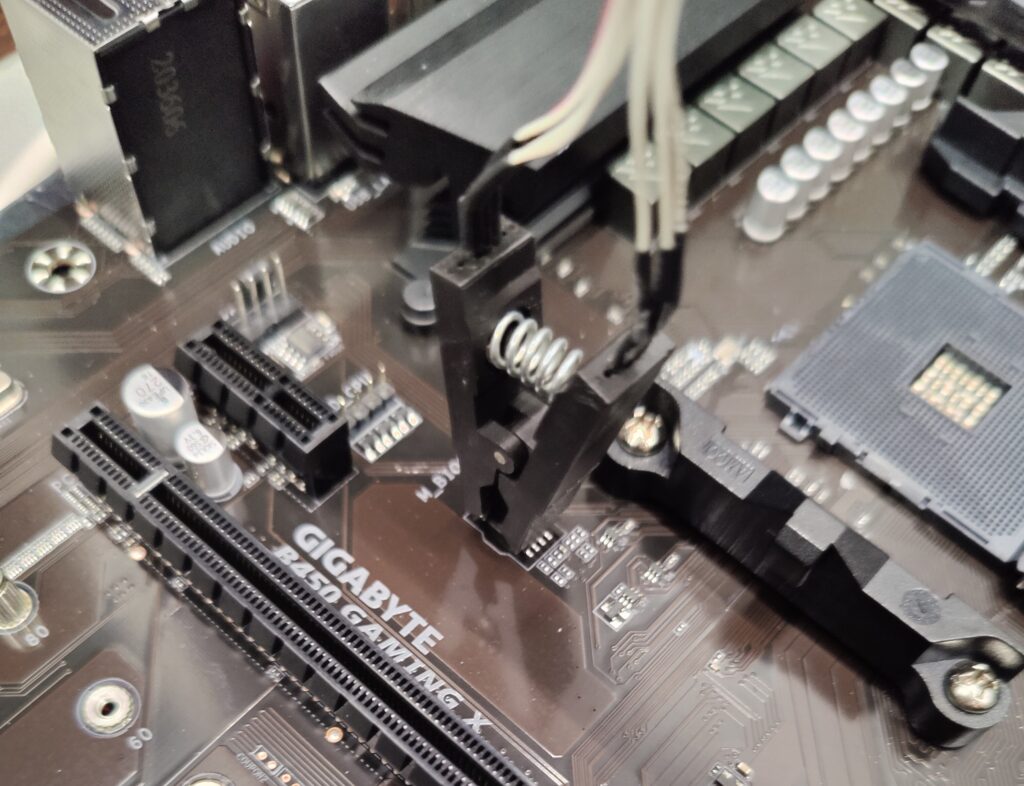
I removed the CPU from it’s socket in order to protect it from reverse voltage from the programmer and hooked the clip directly onto the motherboard’s EEPROM chip

Upon running flashrom, surprisingly the chip was detected on the first try, and I was able to read the data off the EEPROM without any hiccups
~ flashrom -p ch341a_spi -r output1.bin
flashrom v1.2-552-gea0ae15 on Linux 6.0.12.rog.fc37 (x86_64)
flashrom is free software, get the source code at https://flashrom.org

Using clock_gettime for delay loops (clk_id: 1, resolution: 1ns).
Found Winbond flash chip "W25Q128.W" (16384 kB, SPI) on ch341a_spi.
Reading flash...
I then repeated the same command again, outputting to output2.bin. After comparing the MD5sum of both output1.bin and output2.bin and checking that they are the same file, hence ensuring that the connection on the chip is stable, I then sent the command to write the new firmware file onto the EEPROM
~ flashrom -p ch341a_spi -w B450GX.63e
After waiting for the flash to finish, I was finally greeted with the gigabyte BIOS menu, finally marking this project as finished